Grabbing a Share of the Pie – Marketing Fiddle Salad Correctly

Aug 01 2013

The idea of running Fiddle Salad came in a weird way. At first, I was just making a Python to JavaScript compiler and putting it on a website. It was simple enough, as the compiler was already built for it. The back-end for saving and authentication through Google, Twitter, and Facebook used the same one as Python Fiddle. After the site was launched, I noticed that not many people were interested in writing Python. Also, I got a taste of CoffeeScript, which is now my favorite language.

I think the demise of the Python-only fiddle came as a combination of low traffic and no saves. If nobody ever sees it or uses it, then it is better gone. Fortunately, I had the chance to design and develop the next generation of Fiddle Salad to support other languages.

6067OT_3_13

The real Fiddle Salad was launched in April of 2012. I remembered calling the previous version Python Fiddle. Last January, I decided to do an experiment with the CoffeeScript page by creating a separate app in the Chrome App Store. It turned out to double my number of daily visitors. Last May, it was featured on Lifehacker as one of the best apps for development. So why not do it again?

I waited until the right time. Last month and the previous one, the project received major updates which I will be discussing on the Fiddle Salad blog. Meanwhile, I published more apps in the Chrome App Store.

The difference now is that instead of an app supporting more features that show up in searches, I’ve limited the features that are marketed. This way it targets specific audiences. JavaScript programmers don’t want to find out about the features built for CoffeeScript, and a programmer looking for a CoffeeScript IDE won’t bother with an app that doesn’t have CoffeeScript in the title.


No responses yet

Enabling GCC Graphite and LTO on Gentoo

Jul 08 2013

In this article, we will be enabling the GCC options marked with “To use this code transformation, GCC has to be configured with –with-ppl and –with-cloog to enable the Graphite loop transformation infrastructure. “, referred to as graphite. In addition, Link Time Optimization(LTO) refers to the options -flto and -fuse-linker-plugin. -fuse-linker-plugin tells GCC to use an external linker and -flto defers link time optimizations until the final link step so that the optimizer can work across the whole program rather than on individual object files. OpenMP is for parallelization and I save it for another article since I do not have benchmarks to show that it improves performance.
To enable graphite, LTO, and OpenMP it is recommended to first install the latest version of GCC. More recent versions of GCC contain bug fixes for features we are about to enable. The GCC upgrade process is detailed in the guide http://www.gentoo.org/doc/en/gcc-upgrading.xml.

After upgrading GCC, we start enabling the newer features. The steps follow the guidelines on the Gentoo wiki roughly. However,  it is unnecessary to rebuild everything after upgrading GCC as explained in the official GCC upgrade guide. libtool allows packages to be built against shared libraries without rebuilding every time the toolchain is upgraded.
Before adding the graphite USE flag, it is essential to build cloog

emerge dev-libs/cloog dev-libs/cloog-ppl

Then add graphite to CFLAGS and enable graphite USE flags

GRAPHITE="-floop-interchange -ftree-loop-distribution -floop-strip-mine -floop-block"
CFLAGS="-flto=8 ${GRAPHITE} -ftree-vectorize"
CXXFLAGS="${CFLAGS}"
LDFLAGS="${CFLAGS} -fuse-linker-plugin"
# GCC >= 4.8.2 requires the lto flag
USE="graphite lto"

These flags can be appended to the ones you’re already using, although certain flags may conflict with the graphite optimizations. Since graphite flags such as -ftree-loop-distribution is intended to enable further vectorization, I also enabled the -ftree-vectorize flag. The -fuse-linker-plugin is a linker flag while -flto=n turns on the standard link-time optimizer. I set n to 8 for 8 threads while linking. Another factor that could affect performance is -flto-partition, which sets the partitioning algorithm.
To use the linker plugin with LTO, set the linker to Gold:

binutils-config --linker ld.gold

In addition, before compiling the system it is necessary to build GCC with graphite:

emerge gcc
emerge -e world

Dealing with breakages

Several packages failed to compile with LTO and graphite enabled. These flags can be disabled on a per package basis. First create the files in /etc/portage/env/ called no-lto.conf and no-graphite.conf. In no-graphite.conf, disable your graphite flags:

CFLAGS="${CFLAGS} -fno-loop-interchange -fno-tree-loop-distribution -fno-loop-strip-mine -fno-loop-block"
CXXFLAGS="${CXXFLAGS} -fno-loop-interchange -fno-tree-loop-distribution -fno-loop-strip-mine -fno-loop-block"
LDFLAGS="${LDFLAGS} -fno-loop-interchange -fno-tree-loop-distribution -fno-loop-strip-mine -fno-loop-block"

Similary, disable your LTO flags in no-lto.conf:

CFLAGS="${CFLAGS} -fno-lto -fno-use-linker-plugin"
CXXFLAGS="${CXXFLAGS} -fno-lto -fno-use-linker-plugin"
LDFLAGS="${LDFLAGS} -fno-lto -fno-use-linker-plugin"

Every time a package breaks, add a line to /etc/portage/package.env that either disables graphite or LTO. For example, I made these adjustments:

net-misc/curl no-graphite.conf
media-libs/mesa no-graphite.conf
sys-apps/findutils no-lto.conf
sys-apps/gawk no-lto.conf

After adding a line you can resume the system rebuild with emerge --resume.

Notes

Before re-compiling your system, setting moving /var/tmp to RAM speeds things up. The Sabayon wiki has an article on performance, just make sure you reboot after changing /etc/fstab.

After building the current version of PPL, this message is displayed for upgrades:

* After an upgrade of PPL it is important that you rebuild
* dev-libs/cloog-ppl.
*
* If you use gcc-config to switch to an older compiler version than
* the one PPL was built with, PPL must be rebuilt with that version.
*
* In both cases failure to do this will get you this error when
* graphite flags are used:
*
* sorry, unimplemented: Graphite loop optimizations cannot be used

2 responses so far

Phoronix GCC Graphite and LTO Benchmarks

Jul 08 2013

GCC Graphite and Link Time Optimization are new features that many Gentoo users do not enable because they have not been proven to improve performance. I recently did a fresh install of Funtoo optimized for Core i7 and a recompile of the system to run Phoronix benchmarks. Before we look at the benchmarks, it is imperative to note that Phoronix is not intended to test the performance of programs compiled with certain sets of GCC flags. The test suite documentation states,

… for the software being tested that may be installed already on the system by the user, the Phoronix Test Suite will ignore those installations. The Phoronix Test Suite installs all tests within its configured environment to improve the reliability of the testing process.

which means the test suite disables system-wide GCC flags for test packages. So out of the tests I ran, only the ones that tested the packages compiled with Graphite and LTO enabled are worth looking at, and these are PyBench and gzip compression. Of the other tests, video and audio encoding as well as the lzma compression are built using the make command, which bypasses the Gentoo build system. If we look at the individual test packages, the lzma package downloads the lzma source

<?xml version="1.0"?>
<!--Phoronix Test Suite v3.0.0a3 (Iveland) [ http://www.phoronix-test-suite.com/ ]-->
<PhoronixTestSuite>
  <Downloads>
    <Package>
      <URL>http://mirror.internode.on.net/pub/gentoo-portage/distfiles/lzma-4.32.6.tar.gz, http://buildroot.uclibc.org/downloads/sources/lzma-4.32.6.tar.gz</URL>
      <MD5>211d6207fdd7f20eaaae1bbdeb357d3a</MD5>
      <FileSize>478661</FileSize>
    </Package>
  </Downloads>
</PhoronixTestSuite>

and builds it without using Gentoo’s package manager. That means it doesn’t use the GCC optimization flags.

#!/bin/sh

mkdir $HOME/lzma_

tar -zxvf lzma-4.32.6.tar.gz
cd lzma-4.32.6
./configure --prefix=$HOME/lzma_
make -j $NUM_CPU_JOBS
echo $? > ~/install-exit-status
make install
cd ..
rm -rf lzma-4.32.6

cat > compress-lzma <<EOT
#!/bin/sh
./lzma_/bin/lzma -q -c ./compressfile > /dev/null 2>&1
EOT

chmod +x compress-lzma

On the other hand, the gzip package doesn’t require any downloads and uses the system’s gzip

#!/bin/sh

cat > compress-gzip <<EOT
#!/bin/sh
cat compressfile | gzip -c > /dev/null 2>&1
EOT

chmod +x compress-gzip

At last, we are ready to understand the results, which do indicate that these new GCC features improve performance.
http://openbenchmarking.org/result/1307063-UT-GCCOPTIMI03

No responses yet

Upgrading Sabayon and Building Chrome

Apr 26 2013

One advantage of using Sabayon is that you can compile programs to be optimized for your CPU architecture. There are many optimization options and I use -march=native -O3 -pipe -fomit-frame-pointer -ftracer -floop-interchange -floop-block -ftree-loop-distribution -freorder-blocks-and-partition. Chrome on Linux is the fastest browser for sites that you visit often, as they are cached. Furthermore, you can boost Chrome performance beyond the benchmarks.
I follow a few simple steps for upgrading Sabayon:

  1. equo update
  2. equo install entropy equo
  3. equo repo mirrorsort sabayon-weekly
  4. equo upgrade
  5. equo conf update

Wolfden has a nice article explaining these steps. To upgrade Chrome, I use the Portage package manager:

  1. emerge –sync
  2. layman -S
  3. equo install sys-devel/gcc-[version]
  4. gcc-config -c
  5. equo install www-client/chromium-[version]
  6. emerge -av –oneshot –nodeps =www-client/chromium-[version]

There were errors coming from different packages when I tried to compile them without steps 3-5, such as configure: error: C compiler cannot create executables and gcc-config: error: could not run/locate ‘g++’. Installing the gcc version listed in gcc-config -c fixed the problem.

No responses yet

Calculating Prime Numbers in Python

Apr 24 2013

The repository of Python code snippets on Python Fiddle now has 742 posted and counting. Among them, there are several for listing prime numbers. The naive approach by factoring definitely isn’t efficient:

Another approach also contains the hidden double for loop:

Way to go with this one, packing a little program into the regular expression:

If I were to do it, I’d implement it with Eratosthenes’s algorithm.

No responses yet

The CS 467 Experience at Waterloo

Apr 18 2013

At the exam today Professor Mosca wore a suite again. He does that too often teaching the class. Maybe he wants us to take graduate courses in the field. He talks about the classes every time a relevant lecture topic comes up.

Compared to other classes I took this term, I learned the most from this one. I read the first few chapters of the textbook before the class, but got bogged down by the notation. Taking the class and working on the assignments helped me to learn it. The slides had extra material to go along with the textbook.

Those walks in the QNC building were memorable. The wooden stairs hanging in the air with light filtering through glass walls and white boards beside sofas capture the spirit of the building.

The solutions to homework assignments were always simple, but they’re challenging when going through the material for the first time. I spent many days this term working on them, long enough that I would have read How to Solve It at the start of the term. I plan to read that book as I start work next month, since the problems solving skills always help.

No responses yet

Custom Pins on Bing Maps with an Image Frame

Apr 03 2013

On a recent project developing a friend tracking application for BlackBerry 10, I used Bing Maps for showing the locations of people in the contact list because Google Maps did not work on the device. The Bing Maps API has less community support and example code compared to Google Maps. This tutorial explains how to customize a pin in Bing Maps. The goal is to display an arrow pointing to a specific location with a profile picture and the name of the person above it. This is accomplished by using the API where possible with the addition of CSS and images to fill the gap.

To create a PushPin, Location and PushpinOptions objects are passed as arguments.
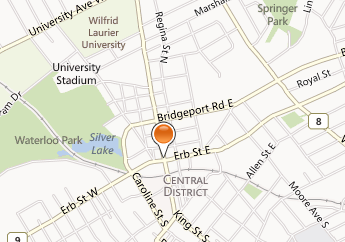
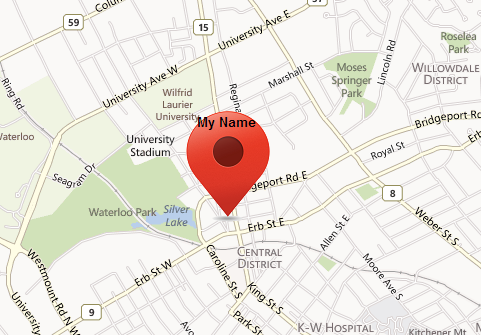
Bing Map PushPin

the default PushPin

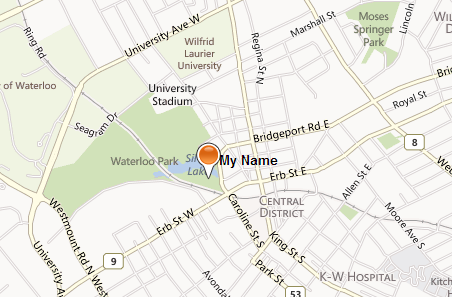
When initializing the PushpinOptions object, the relevant options for positioning and displaying the text are text and textOffset.

var pin = new Microsoft.Maps.Pushpin(new Microsoft.Maps.Location(lat, lon), {
        text: "My Name",
        textOffset: new Microsoft.Maps.Point(-12, 10),
        typeName: 'blackText',
        width: 128
});

In order to display the text label so that the letters appear on a single line, it is necessary to make the div wider by adjusting width. Note that setting the width has shifted the pin, which will be readjusted later. The textOffset option sets the amount the text is shifted from the PushPin icon. By default, the Bing Maps uses a white text label. It can be changed by setting its CSS class using the typeName option. Here, we set the typeName to “blackText”.

.blackText div {
    color: black !important;
}

Bing default PushPin with label

Bing Maps allows the pin to be replaced with an icon, but there is no API for overlaying an image on a pin.

var pin = new Microsoft.Maps.Pushpin(new Microsoft.Maps.Location(lat, lon), {
        text: "My Name",
        width: 128,
        textOffset: new Microsoft.Maps.Point(-12, 10),
        typeName: 'blackText',
        icon: "images/Map_pin2.png",
        height:128
});

Bing default PushPin with icon
However, the goal is to display a dynamic profile picture with a pin below it. The solution is to use the same approach for setting the label color. I inspected the HTML elements with jQuery on $(‘.blackText’). This is a useful technique when the HTML element cannot be located with the mouse cursor in Chrome developer tools or FireBug.

<a href="#" class="blackText MapPushpinBase" style="position: absolute; cursor: inherit; overflow: hidden; pointer-events: all; left: -64px; top: -128px; width: 128px; height: 128px; line-height: 0px;">
<img src="images/Map_pin2.png">
<div style="position: absolute; text-align: center; width: 100%; font-weight: bold; font-style: normal; font-variant: normal; font-size: 10pt; line-height: normal; font-family: Arial, Helvetica, sans-serif; color: rgb(255, 255, 255); left: -12px; top: 10px;">My Name</div>
</a>

Since blackText is an anchor tag, it is possible to insert a background image for it:

a.blackText {
    background-image: url("images/Map_pin2.png");
    background-repeat: no-repeat;
}

and replace the pin image in the API call with the profile picture:

var pin = new Microsoft.Maps.Pushpin(new Microsoft.Maps.Location(lat, lon), {
        text: "My Name",
        width: 128,
        textOffset: new Microsoft.Maps.Point(-12, 10),
        typeName: 'blackText',
        icon: "http://placekitten.com/80/80",
        height:128
});

Bing PushPin overlay image
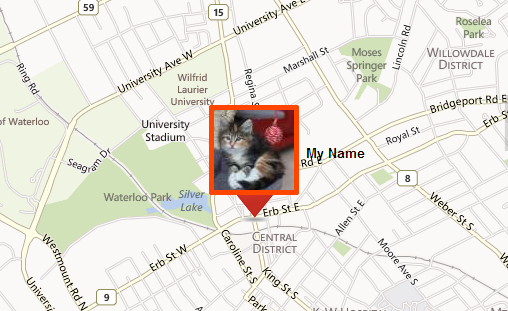
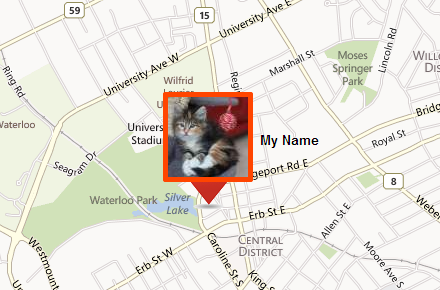
The next step is to reposition the image and the label. Since the CSS border width can push the content in the CSS box model, the border width should be set before adjusting margins and padding.

I added an orange frame around the profile image to make it fit with the pin.The background color shows through the padding, with the margin adjustment pushing the image to the right.

a.blackText img{
    margin-left: 8px;
    margin-top: 0px;
    padding:5px;
    background-color:#ff4500;
    -webkit-border-radius: 2px;
}
var imageHeight = 80;
var pin = new Microsoft.Maps.Pushpin(new Microsoft.Maps.Location(lat, lon), {
        text: "My Name",
        width: 168,
        textOffset: new Microsoft.Maps.Point(50, imageHeight/2),
        typeName: 'blackText',
        icon: "http://placekitten.com/80/80",
        height:128
});

Bing PushPin with custom image
As a bonus, why not add a pink double border? Simply override the default image border with a higher priority rule.

a.blackText img{
    margin-left: 2px;
    margin-top: 0px;
    padding:5px;
    border:3px solid #ffb6c1 !important;
    background-color:#ff4500;
    -webkit-border-radius: 2px;
}

Bing PushPin custom image double border
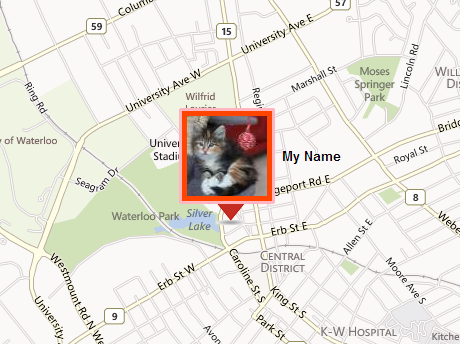
Finally, the pin needs to be repositioned over its original location. The anchor option sets the (x, y) offset of the pin relative to the width and height.

var pin = new Microsoft.Maps.Pushpin(new Microsoft.Maps.Location(lat, lon), {
        text: "My Name",
        width: 168,
        textOffset: new Microsoft.Maps.Point(50, imageHeight/2),
        typeName: 'blackText',
        icon: "http://placekitten.com/80/80",
        anchor: new Microsoft.Maps.Point(52,112),
        height:128
});

Bing PushPin anchor position

No responses yet

How To Shrink VMware Virtual Disk Files with Windows Guest

Feb 20 2013

While at home for reading week, I set up my development environment on Windows XP Professional, 64-bit. XP x64 was never meant to be run on real hardware, as it lacks driver support from hardware vendors. However, it was free for students and quick to set up with VMWare as I only had to enter the license key for an unattended install. I originally indended to carry around the virtual machine on a 8GB USB, but the hard disk file exceeded by a few GB. I managed to shrink all the files required to run the virtual machine combined down to less than 3GB. Here’s a quick run down of the process that requires about 1 hour for a computer to complete:

  1. Uninstall unused applications
  2. Delete downloads manually
  3. Clean out temporary files with CCleaner
  4. Shutdown virtual disk and make a copy
  5. Hook the virtual disk into slot2 and start the virtual machine Settings -> Hard Disk -> Add…
  6. Zero out unused parts of partitions on the copied disk with KillDisk wipe
  7. Shutdown virtual machine to work with the virtual disk file
  8. Defragment copied hard drive under Settings -> Hard Disk -> Utilities
  9. Compress copied hard drive
  10. Find the virtual machine working folder under Settings -> Options tab
  11. Replace the larger virtual disk file with the smaller one
  12. Create a zip folder of the virtual machine files, 7-zip is suggested

It’s easy to see why this process works, if you understand how file systems work. Because deleted files are still on the hard drive, they cannot be compressed in the virtual disk file. So the idea is to overwrite those unused sectors of the hard drive with zero’s. VMWare’s defragment collects zeros together at the end of the disk, and compress completely removes them from the virtual disk file, shrinking the file. If you’re making a clone of the virtual machine for later use, it is suggested to start the operating system again as it will detect hardware changes and reconfigure. Many of these steps take a few minutes to complete, so it is wise to have something else to do while waiting.

Update: Instead of using KillDisk, CCleaner has a wipe utility under Tools -> Drive Wiper. The default settings writes zeros over the free space. Compared to my method, it’s slower. One way to speed it up is to give the process realtime priority in the Task Manager.

No responses yet

Waterloo CS 467 First Impressions

Jan 25 2013

CS 467 is Introduction to Quantum Information Processing, which I have with Michele Mosca. He has received many awards and written the textbook with other authors for the course. However, he is a very approachable professor. He gives detailed answers to questions during lecture and stays after class to answer questions. He makes the subject more approachable pointing out areas that he had trouble with when he started in the field, making sure we are better prepared to read papers in the area. With people like him doing research and teaching students, quantum computing will be ubiquitous in 15 years and Waterloo will be heading the effort.

Besides wanting to take the course for a long time, the course also cleared up assumptions I had:

  • What makes quantum theory able to accommodate Schrödinger’s cat is the probabilistic representation of qubits, which isn’t magical at all in mathematical terms.
  • Information can only travel as fast as light, as in the case of quantum teleportation where classical bits are sent to transfer qubits
  • Unmeasured quantum states can change simultaneously, as in entanglement
  • The secret ingredient to quantum computation: only measure what you need to know. As in the case of error correction codes, only measure the error


No responses yet

Celebrating e17’s Release

Dec 22 2012

I just started using e again yesterday after installing Sabayon. With the most recent version, it has become the most productive desktop environment I’ve every used with features like:

  • automatic cursor center on new windows
  • focusing of windows under cursor, allowing typing and clicking without raising
  • coupled with transparency on unfocused windows

I also updated my performance tweaks for Sabayon, so it’s the best browsing experience, too, with right click link mapped to open foreground tab. So I got to experience e17 as it was released today after about 7 years of development.

No responses yet

« Newer - Older »